Conditions of Alojamento da Rua da Fonte
The on-line version of this document can be found at:
http://jgte.github.io/zh/en/desc
Issues
Previous guests have informed me of the following issues:
- The hot water is difficult to control on the first floor. As I describe in the section below about hot water, the issue has mainly to do with the water pressure provided by the public distribution system. You can avoid this issue if you use the showers outside the rush-hours of water use or by using the shower downstairs.
- The oven is difficult to light. Please read the section below about the stove and oven describing how to do this safely and quickly.
- The TV does not come on. Please read the section below about the TV describing how this is done. The problem has to do with the relatively long time that the decoder (the black box next to the TV) takes to acquire the signal.
External areas
You have access to the terrace, the balcony upstairs and the yard in front of the house (between the street and the western wall of the house). The driveway on the south and the yard on the east are only for emergency. The external kitchen door leads to the eastern yard, you can find the key of the lock hanging on the wall to the left of this door. You may also access the gas storage, if needed, see the section on operating the gas supply.
Appliances
Stove and oven
The stove and oven in the kitchen are powered by gas. See the section on gas for further details, in case it is not possible to use it. There is no in-built igniter, so you’ll need to use the matches or lighters resting on the small shelve on the top left of the stove.
The oven is at times a bit stubborn to ignite. Follow these steps if you have difficulties:
- Be sure gas is reaching the stove, by checking if you can light one of the gas dishes at the top of the stove. If this is not the case, see the section on operating the gas supply.
- Open the door of the oven all the way down.
- Strike a match (you may also use the lighter fluid igniter, the one with the long neck). You MUST strike the match or light the igniter before you turn on the gas. DO NOT open the supply of gas before having an open flame ready.
- Press the middle knob and rotate it a quarter of the way. You should hear the gas coming out. Keep pressing the knob. If you let go of the knob, you will not be able to light the oven. To be clear, there are two motions required: pressing and rotating the knob. You need to keep the knob pressed until step 8.
- Insert the match into the hole at the bottom of the oven and wait until the gas ignites. There may be air in the gas tubes and it may take a few seconds before the gas reaches the oven.
- If you start smelling gas but there is no ignition, it means you did not insert the match enough down into the hole. Release the pressure on the knob, turn it back to the off position and go back to step 2. You may try removing the small metal cover around the ignition hole so you have a better viewpoint of the ignition spot.
- After the gas ignites, keep the knob pressed for a few seconds. This will ensure the flame doesn’t extinguish once you remove pressure from the knob.
- If the flame goes out when you release the pressure of the knob, go back to step 2.
- With the flame burning and without pressing the knob, you may rotate it further to diminish the flame intensity. The oven is ready.
Dishwasher
- Load it with dirty dishes in the usual way.
- Put soap in the compartment (only use dishwasher soap, do not use normal soap, it makes way too much foam and it will spill all over the floor; don’t ask me how I know this).
- Close the lid of the soap compartment.
- Close the door of the dishwasher.
- Rotate the button on the top right until you align the mark on he button with the mark on the body. There is only this mark, since the remaining markings are worn out.
- Turn on the power using the red switch on the multiple power sockets, which is resting on top of the dishwasher, on the far right corner. The red switch will be lit, indicating that electricity is flowing and the microwave will beep (since it too is connected to this multiple power socket). Be sure to disconnect the toaster (by yanking the respective power cord).
- Pull the button on the dishwasher out. It should start making noises.
- After the washing is finished, turn off the power before opening the door.
Notice that you should turn on the power only after closing the door of the dishwasher and turn it off before opening the door.
Microwaves and toaster
As mentioned before, there is the need to turn on the switch at the multiple power socket that is resting on the dishwasher before the microwave and toaster can be used. Note that the toaster does not have an off switch, that is effectively done by unplugging it from electricity. If you only want to operate the microwave or the dishwasher, please be sure that the toaster is disconnected from electricity.
Fridge and freezer
The fridge should be fully operational when you arrive. If that is not the case, check that the power plug is connected to the power socket, on the wall to the left of the fridge.
Washing machine
- Load the dirty clothes in the machine (do not over-fill it, otherwise it will not start).
- Close the glass door.
- Open the soap container located on the top left of the front panel.
- Fill the soap and softener compartments, and the chlorine compartment if needed.
- Close the soap container.
- Connect the power cord to the power socket on the wall behind the washing machine.
- Push the round button immediately to the right of the soap container.
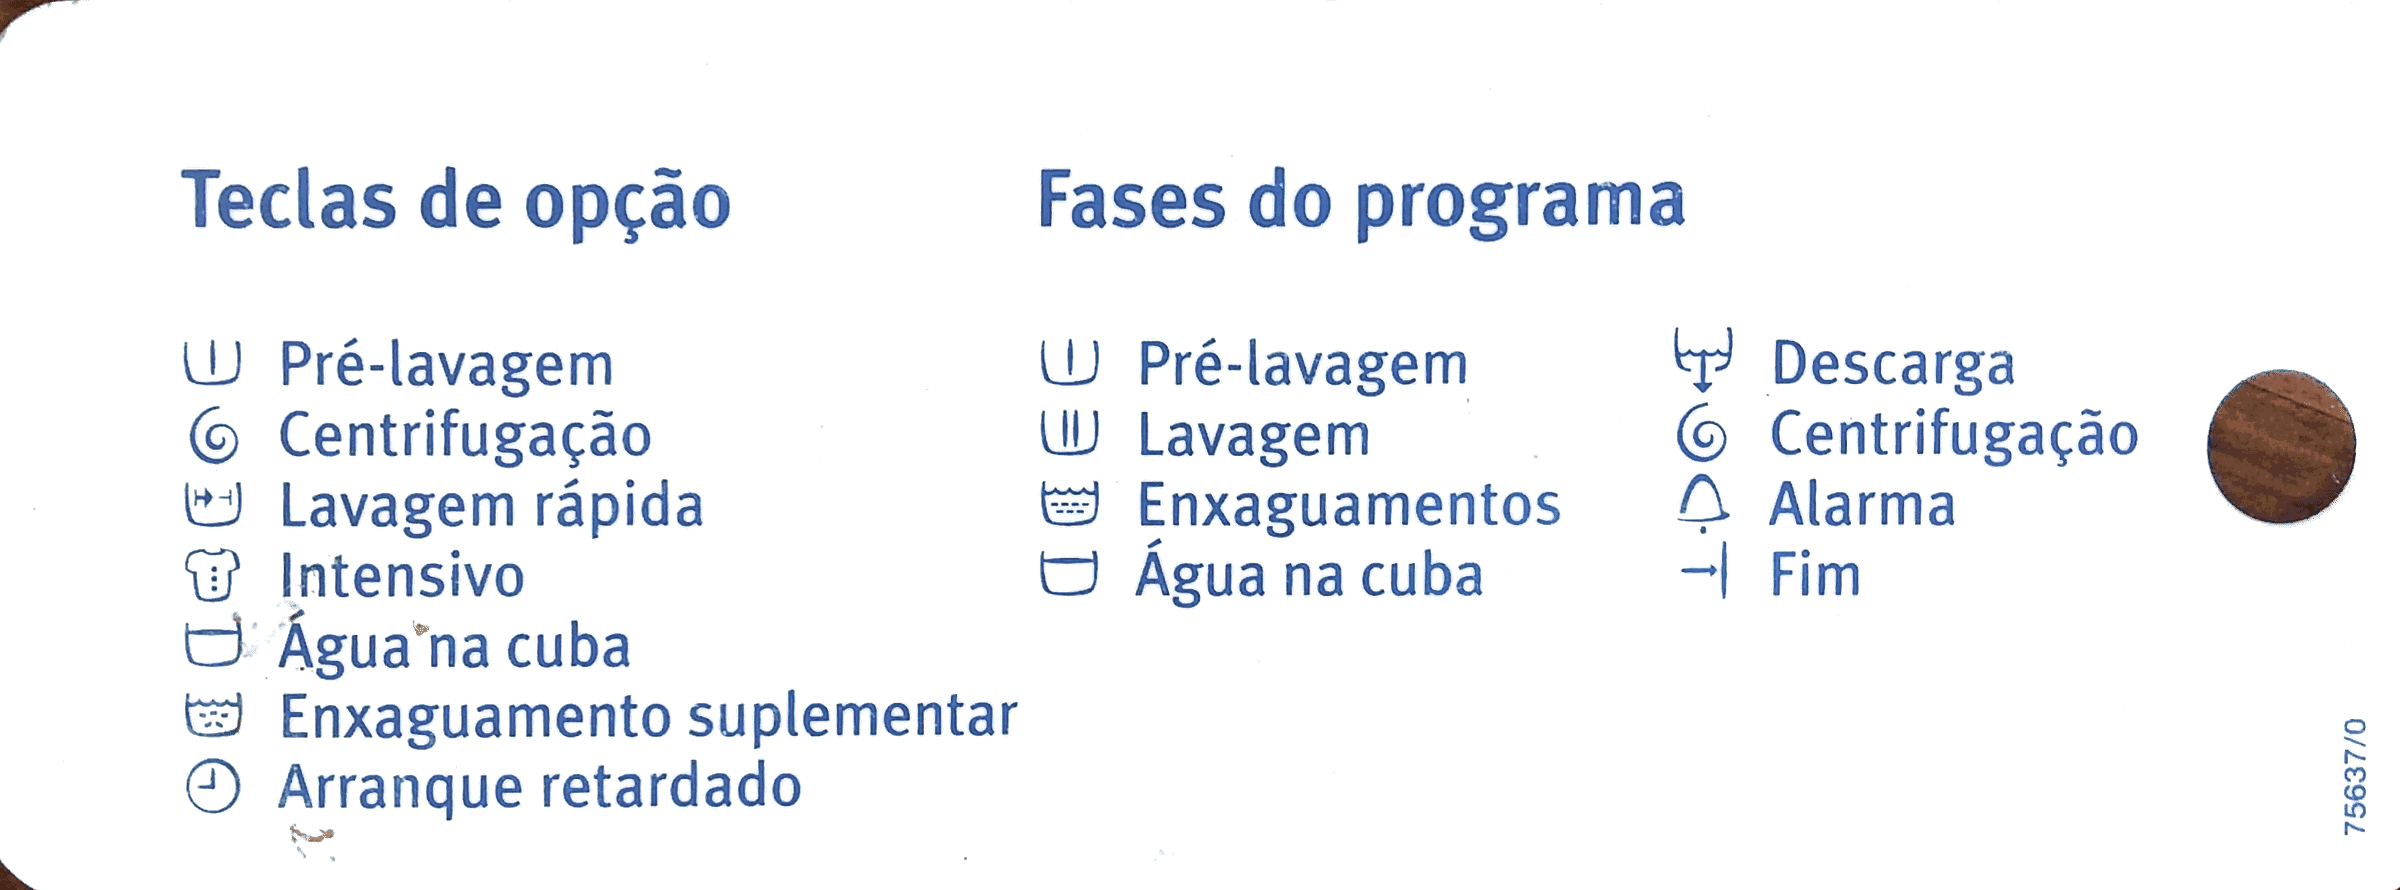
- Rotate the dial to select the appropriate washing program. The following pictures show the meaning of the symbols printed in the washing machine (in Portuguese).
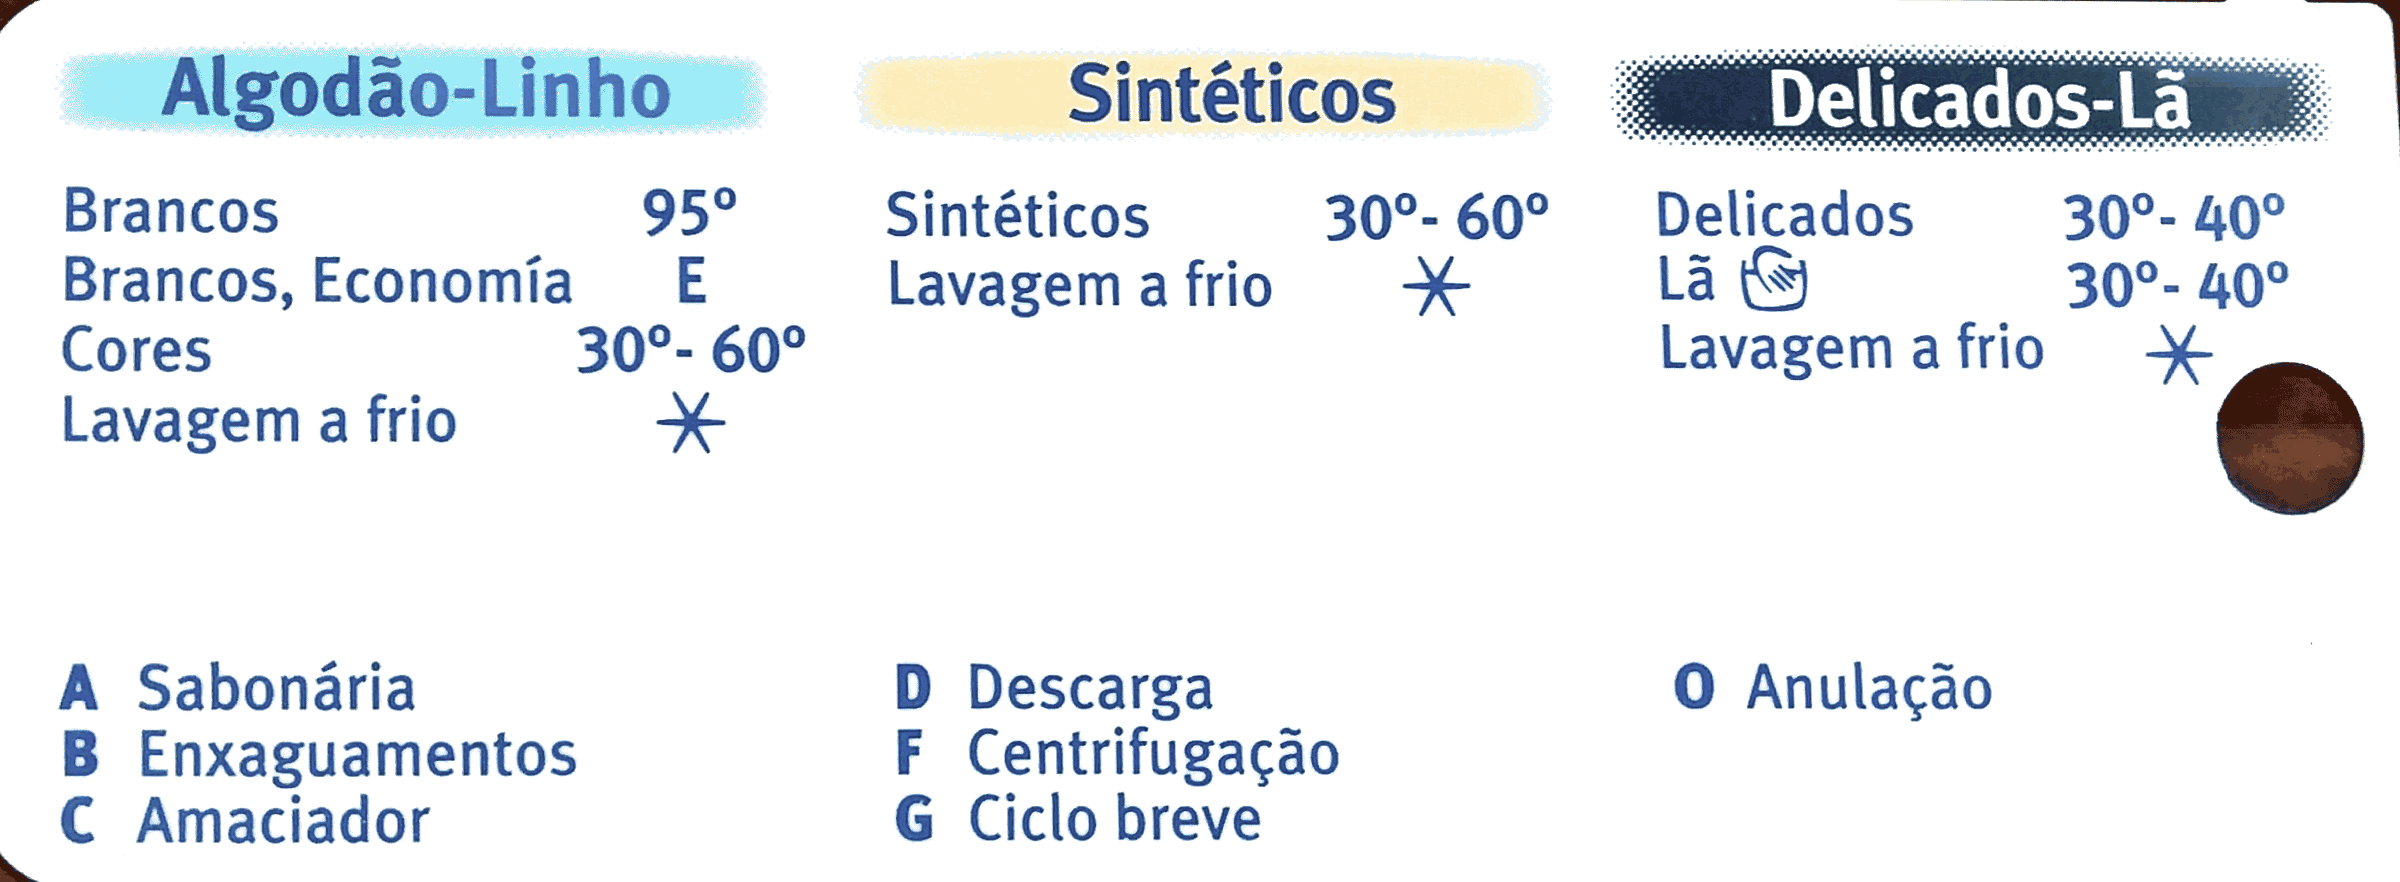
 Blue is for cotton or linen clothes, yellow is for synthetic clothes and black is for delicate or woollen clothes, in decreasing order of program length and washing intensity. The time it takes to finish the program is shown on the led panel at the front of the washing machine.
 - Push the small diamond-shaped button on the far right. After a couple of seconds, it should start making noises.
- After the program finishes, turn off the machine by pressing the round button, disconnect the power cord from the power socket and open the glass door.
TV
The TV only shows the open signal TV stations. They are all Portuguese although you may find programs in English (or any other language for that matter). In Portugal, foreign TV shows are subtitled (except for children shows). The following channels are available:
To turn on the TV, follow these steps:
- Make sure the TV and the decoder (the black box next to the TV) are powered.
- Pick the decoder remote and press the big red button (standby/on), while pointing the remote to the decoder. The red and green lights start flickering. Sometimes this only happens after a minute or so (but you may proceed to the following step).
- Turn on the TV by touching the on/off light (I have marked this area because it’s difficult to see during the day). There should be an image saying that the signal is getting acquired. If you do not see this image, wait for a minute or so. It may take somewhere up to a a couple of minutes for the decoder to send this image to the TV.
- If this image is still not present but there’s a message saying “no signal” (or something to that effect), the input to the TV may be wrongly selected. Check at the back of the TV which HDMI port is connected to the decoder (other guest may have changed this) and use the input selection button (at the the bottom right of the TV).
- After 30 seconds (up to a couple of minutes), the lights in the decoder stop flickering and only the green light will be on. At that time, the TV picture should be seen on the TV. Use the decoder remote to change channels.
- If there is no sound, turn off the TV and then turn it on again (by touching the on/off light on the TV). If that doesn’t work, do the same to the decoder, by pressing the big red button (standby/on) on the decoder remote.
The TV is relatively modern (it’s a flat screen TV) and has several digital inputs (2 HDMI ports). Please feel free to plug in your devices.
Services
WiFi internet
There is WiFi internet throughout the house. The SSID is Lajinha and contact me to get the password. The traffic is limited to 30Gb, with a maximum of two 1Gb recharges.
During the summer months, the influx of tourists causes the network to overload and the speed might not be as high as expected.
Bed sheets and towels
Bed sheets and towels are available during your stay. If you need more, please contact Sra. Zina Sirooka so that she can provide you with more.
Additionally, there are two blankets, one bed cover and (one or two) pillows for each bed. You can find them in the closets, in every room.
Beach gear (beach towels, parasol, beach chairs) is not available at the house, so it is a good idea to bring them.
Laundry
Please contact Sra. Zina Sirooka if you want some clothes to be washed and/or ironed. Arrange directly with her the payment for this service. The washing of the bed sheets and towels is included in the renting cost.
Cleaning
Please contact Sra. Zina Sirooka if you want to have the house cleaned during your stay. Arrange directly with her the payment for this service. The cleaning of the house before you arrive is included in the renting cost.
Hot water
Hot water is available in both toilet rooms and in the kitchen, and is supplied by the water heater above the kitchen sink. The water heater is automatic, meaning it will turn on whenever a hot water tap is opened. Note that it can take a minute or so before hot water reaches the toilet room upstairs. Make sure the yellow valve is open before using hot water. Refer to the section on gas for more information about the gas supply.
The water heater has a safety feature which prevents operation when the carbon dioxide concentration is too high. Although the exhaust gases of the water heater are diverted outside through a dedicated conduct, it may happen during stormy or windy conditions that theses gases have difficulty flowing out, increasing the concentration of carbon dioxide and shutting down the gas heater. If that is the case, open the kitchen window and external door (unlock it with the key hanging on the wall to the left of the door), close the internal door and wait for 10 minutes before trying again. Once the kitchen is ventilated (which fortunately happens quickly when windy), the gas heater will start working again automatically once you open a hot water tap.
There are some buttons and a dial on the water heater but they only control how hot the water gets. There is an on/off button but it should never be off.
During the summer months, due to the large influx of tourists, the public water network is in high demand and, for this reason, the water pressure may drop considerably, specially between 19:00 and 21:00, when everyone is coming back from the beach. This may make it difficult to regulate the temperature of the water in the bathtubs, specially upstairs. The problem is that, starting from full hot water, as you turn the tap towards cold water (even if done slowly and progressively) there will be a point when the pressure of the hot water drops below the minimum level that the water heater can handle, and it will cause the gas burner to shut down. This means that the water is either too hot (because insufficient cold water is mixing with the hot water) or too cold (because no hot water is flowing due to the gas burner being off). Unfortunately, there isn’t a good way to fix this issue because it originates in the low water pressure in the public water network. Fortunately, this problem is most significant in the bathtub upstairs, while downstairs the problem is much more manageable, partly because the hot water reaches the shower head very quickly, so it’s easier to control, partly because the water pressure is higher.
Note also that the water pressure is (usually) not enough to supply both showers with hot water at the same time.
Operations
Light switches on the ground floor
The light switches on the ground floor 50 years old. This means they sometimes might be a little stubborn to work as expected, but they are all operational. If you flick the switch and the light doesn’t come on (or off), grab the small lever (the piece that moves) and wiggle it sideways. This will help release the spring inside and the switch will work as expected.
Main water valve
On the external southern wall of the house, close to the South-western corner, there is a small white plastic panel covering the valve that turns off the water in the whole house. If you exit through the front door, turn immediately to the left, go around the corner and you should see this white plastic panel a roughly waste height.
Please contact Sra. Zina Sirooka if you need assistance.
Main electricity switches
On the right wall immediately after entering through the front door, there is a painting hanging on the wall. This painting is covering the electric switch board. There is a warning sign below.
The panel is divided into three sections: from left to right you will see:
- three old-looking push buttons on top and the main electric switch on the bottom;
- two modern-looking switches;
- the electricity counter.
The useful part of the panel is the first one. The three push buttons, from left to right, control the following:
- Lights and power sockets on the ground floor, except washing machines and the storage room under the stairs;
- Washing machined;
- Lights and power sockets on the top floor and the storage room under the stairs.
The big switch below the three push button cuts the power to the whole house.
Please contact Sra. Zina Sirooka if you need assistance.
Gas
The hot water, stove and oven are heated with gap (propane). The gas tube comes from a small storage room outside the kitchen, to the right of the external kitchen door (use the key hanging to the left of the kitchen door to unlock it). It enters the kitchen close to the sink and travels to the stove above the counter. On this tube you will find a couple of yellow valves. If these valves are aligned with the direction of the tube, they are open. If they are perpendicular to the direction of the tube, they are cutting the flow of gas. Be sure to open these valves before operating the stove or using the hot water.
To access the gas tanks, you simply open the door of the small storage room outside of the kitchen. Inside you will see this:
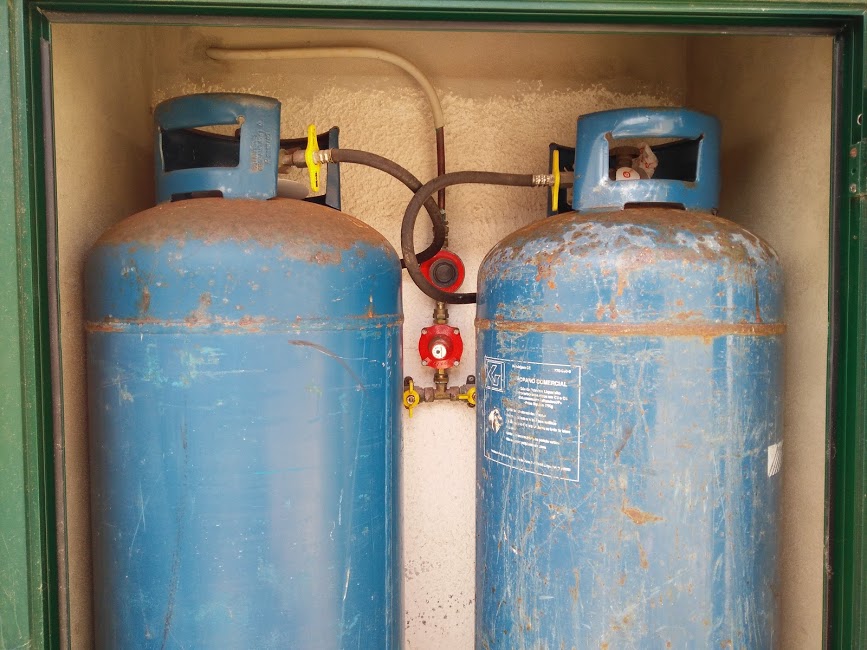
These are 40 litres propane tanks and they should last for a long time. At the top of the picture, you see the gas pipe going into the kitchen. It comes down through two red regulators, that make sure the gas pressure at the stove and water heater is adequate. From the bottom regulator, the pipe splits right and left, into both gas tanks. There are two yellow valves immediately after the pipe splits. The valves control which tank is supplying gas.
In case you run out of gas, chances are that the unused tank is full. All you need to do is switch the supply to that tank:
- Close the yellow valve leading to the tank in use, i.e. the valve that is currently open (the one on the right, in the picture above). You do this by rotating the valve so that is becomes perpendicular to the pipe (like the valve on the left, in the picture above);
- Open the yellow valve leading to the other tank.
Do not open both valves at the same time. This will spill gas between the tanks, making it likely that both tanks need to be replaced at the same time and possibly preventing you from having hot water for a period of time.
Please inform Sra. Zina Sirooka when a gas tank is empty so that she can order a new one to replace the depleted one.
Water quality
Officially, the tap water is fit to drink and I do it sometimes. However, I do not advise it during the peak summer months. Zambujeira being crowded combined with the dwindling water supply means the water quality decreases. This is specially the case during drought years. It would taste strongly of bleach, for example.
At the beach, there is a creek flowing to the ocean. These waters are treated and do not present any health risk (cf. Quercus atribui “Qualidade de Ouro” a cinco praias do Litoral Odemirense, in Portuguese). However, the water is not drinkable and I highly advise that you keep young kids away from it.